Wednesday, 3 June 2015

Eco Cosmetic sunscreens: a discussion of my favourite products

Eco Cosmetics produce a wide range of sunscreen products, and I have been using quite a few of them for a year now. I really like the products in general, but I wish they would make some of them less oily, easier to rub in.

Most products leave the skin well nourished, but this is also a problem. My face often looks like I rubbed half a jar of coconut oil on it when I use Eco Cosmetics sunscreens.

The only product that doesn't do this to a high degree is the tinted day cream with SPF 15.

So, onto my review...


I snuck in another sun protection face product: ILIA Sheer Vivid Tinted Moisturiser SPF 20... It is not a 100% natural cosmetic, as they use silicone in the formulation. 

First from left in this row, the Lip Care stick from Eco Cosmetics, SPF 30. The stick is quite solid and waxy, and leaves a slightly yellowish white layer on the lips. It kind of reminds me of the lip SPF sticks I used to use for skiing. I can see why the stick consistency is the way it is, it needs to stay on the lips to protect, but it just doesn't feel comfortable. It is not especially caring either, and I don't use it regularly. I will not be buying it again.

Second from left is the tinted face cream SPF 15. I really like this product, and am on my second one. I use it almost daily. The only thing is that it takes quite a while to sink into the skin, and I find it leaves the skin a bit tacky. A layer of mineral powder (more sun protection, so that's good) over the top solves this, as well as reduces the shine the cream leaves. The colour blends in well, although it is a little too pink for my complection. I will definitely buy again, this is a great product for every day, especially if you don't have to sit out in the sun and work in an office like I do.

The third product is the facial sun gel, SPF 30. I have a love/hate relationship with this gel. I think it smells nice, and really nourishes the skin, but if you accidentally take too much, you look like a shining oil ball! The product does not sink into the skin very well. I have quite dry skin on my face, and I find this too fatty. When you accidentally get it on your lips, it leaves your lips all warm and strange feeling. I keep this product in my hand bag and take it to work for when we have an al-fresco lunch and I need some sun protection at midday. I initially loved this product, but am on the fence now and will not be rebuying it for the time being.

Finally on the right, the odd one out in this post: ILIA Sheer Vivid Tinted Moisturiser SPF 20. Although it is technically not a natural product due to the silicone that is added to the formulation, the other ingredients are really nice. After trying a sample of this product I bought it. It goes on smoothly (silicone!) and does not leave the skin dry or greasy. The colour is on the yellow side, but seems to fade into my own skin colour leaving it nice and even. Coverage is light. The consistency of the cream is lotion-like and quite liquid. Due to the silicones that are added to the formulation, I will not rebuy this product, although for face SPF it is the best one that I have used so far.


Below from left above to right below: Eco Cosmetics Sun Gel SPF30, Eco Cosmetics Tinted Face Cream SPF 15, and ILIA Sheer Vivid Tinted Moisturiser SPF 20.


I also bought Eco Cosmetics Compact Foundation SPF30. This product hasn't been in my hands long enough to write a proper review yet, but so far I like it. The product goes on matte and does not leave the face greasy. The colour is a little too pinkish for me, and I need to correct this by applying a dusting of my mineral foundation over the compact foundation. I think this product would be an ideal handbag item, for touch ups during the day before going out in the sun.


Now for the other sun care products. I have four products that I use on my body for sun protection, none lower than SPF 30. I am quite pale skinned and do not tan easily, get sunburn if I don't protect myself, so SPF 30 is really the minimum for me.


First on the left is Eco Cosmetics Sun Lotion SPF 30. I like this product very much. It blends in quite well, and the amount of oiliness and shine left on the skin after applying is within acceptable limits. It is slightly white, but if you blend it in properly it is not noticeable. The fragrance is quite lemony, which leaves me to wonder why many natural sun screen products have citric fragrances when it is well known that citrus oils are photosensitising. It just doesn't seem to make sense to me. So this is also my only reservation that I have about this product. I will use up and then decide what to do. The citrus fragrance does cause me to have concerns.

The second product in the middle is the Eco Cosmetics Sun Lotion Neutral SPF50. This product does not contain fragrance, which is a big plus point. However it is thicker than the SPF30 lotion, and takes a little more work to rub in. It leaves a slightly white sheen, but this does go after a bit. The lotion has quite a thick, oily consistency and leaves me feeling tacky for a long time. It does do a fabulous job though, and I have had no issues when I had to be in the midday sun for longer periods of time whilst wearing this product. Definite rebuy!

Eco Cosmetics Tinted Sun Cream SPF 30 is the last one on the right. This product is fine, but don't wear if you have light clothing on. It leaves unsightly brown stains everywhere you touch your skin that has been covered with this product. The texture is like a rich cream, and thus it leaves you shiny for quite some time. The nice thing about this product is that it is tinted, so you do not get the white problem when applying. It is also the negative point about this product. I think if you wear this on the beach in a bikini it would be fine, for everything else it is impractical. Since I do not care about looking white, as I am already pale,  I will not be rebuying.

From left to right: Eco Cosmetics Sun Lotion SPF30, Eco Cosmetics Sun Lotion Neutral SPF 50, Eco Cosmetics Tinted Sun Cream SPF 30:


Finally, the Eco Cosmetics Sun Oil SPF 30: I love this! It goes on quite oily, but it does sink into my skin well and it feels really nourishing. It leaves the skin with a glow. Nothing much else to add: this is definitely going to be a rebuy!


Since I have so many Eco Cosmetic sun care products, it would be silly to start buying other brands right now. I will finish what I have first and then try out some other brands to compare.


SOTD (Sample Of The Day) for today is:


Melvita Pulpe de Rose Plumping Radiance Serum. Like it said on the back of the sample, I used this on my cleansed face this morning. I like it. The smell is lovely, and the serum felt nourishing. The product goes into the skin fairly quickly and left it nice and soft. I would think that this is a great product as a basis for make up. I do not know if I will buy it. I have a buying stop, so it will have to wait until I run out of all my facial care products!!!

I'm off to Berlin for a long weekend with BF, but since I have a buying stop on natural cosmetics, I think it is most likely that I will not be visiting any specialist shops. It would be too difficult to resist the lure of more potentially amazing products! 

xxx


Tuesday, 2 June 2015

Apologies: I keep meaning to post and then life interferes!

I have been contemplating how to get back into the swing of blogging, and nothing seemed to get me going again! We have been spending lots of time in the garden, getting everything ready for summer.
The raised garden bed now has several kinds of radishes, spring onions, kohlrabi, broccoli, endives, cabbage, pumpkin and courgette (zucchini) growing. We also have pots with tomatoes, cucumbers, and aubergines (eggplant) growing. Not to mention the enourmous quantity of herbs! Can´t wait for the harvesting! We did have our first radish harvest, they grow so fast! Next lot is growing fine already...


My mother told me the greens from radishes are great for salads. But when I was told I had thrown the leaves on the compost already!! Next harvest I will definitely make a nice radish salad with the leaves and the bulbs.

I tend to do my household cleaning with baking soda and vinegar mainly but recently I was visiting my family in the Netherlands and was in a local supermarket where I found some environmentally friendly cleaners that I just had to try out. They are by Eco-Friendly cult brand Method, and really smell lovely! I love the packaging too...


This weekend I spent some time really sorting through my natural makeup and personal care collection. Not only have I got too many full sized products, the amount of samples I have is getting ridiculous! So, I am back to testing and reviewing. Summer is coming soon so I will be looking at self tanning lotion from Melvita (I STILL haven´t tested this!!!), a listing of my favourite sunscreen products from Eco Cosmetics and their latest product offering,  and a review of cream deodorants from four different brands (Wolkenseifen, Waldfussel, Ponyhütchen, SoapWalla)..

I am also going to use up and try out and review all the samples that I have collected over the last 12 months... I think I could really write every day if I wanted to, with the amount of stuff that I have bought and collected this last year.

I am now on a natural cosmetics buying ban; first I have to use up what I have before I can shop for more.

We are off to Berlin for a long weekend, and the weather is going to be hot and sunny, so the ideal time to test the sun products. First though I have to exfoliate my legs so I can finally test out the self tanner from Melvita! Review to follow in a couple of days.


xxx


Wednesday, 4 February 2015

Lots of keto foods: Recipes and pictures! PART 2

To continue my recipes, next up will be the Rahmgeschnetzeltes...

Rahmgeschnetzeltes (creamy pork strips)
serves 2-3
ingredients:
300 grams pork fillet, sliced in strips
salt
pepper
paprika powder
1 TB of expeller pressed coconut oil
2 TB butter
1 small onion chopped finely
300 grams mushrooms, chopped (I tend to use ones that are in season, this time I used the brown champignons)
1 clove of garlic, pressed
some fresh thyme, finely chopped (maybe half a teaspoon)
1/2 cup of beef stock (I used homemade)
200 gram pot creme fraiche
freshly chopped flat leaf parsley to garnish


Season the pork strips with the salt, pepper and paprika.
In a heavy skillet melt one TB of the butter and sautee the chopped onion until golden. Right before the end, add the pressed garlic and the mushrooms and cook until soft. Add the thyme and stir. Remove the onions/garlic/mushrooms with the fat from the pan. Now melt the coconut oil and the rest of the butter in the pan and let brown lightly, and then add the seasoned pork strips. Fry until lightly browned and cooked through. Now add the onion/ mushroom mixture back to the pan, and add the beef stock and deglaze. Leave to simmer so the liquid is reduced and the meat becomes tender. Add the creme fraiche, taste to see if it needs more salt, garnish with the fresh parsley and serve. If the sauce is not as thick as you would like, thicken it with a little guar gum. I served this with cauliflower mash and half an avocado, but it is just as delicious with zucchini noodles, shirataki noodles or a nice green salad.


Next up: Stamppot!

Stamppot (a Dutch mashed winter dish!)
serves 4
ingredients:
2TB butter
2TB expeller pressed coconut oil
1 medium cauliflower (cooked, and mashed with 3 oz of cream cheese and seasoned with salt and pepper)
1/2 savoy cabbage, chopped
1 small onion, finely chopped
1 clove of garlic, pressed
4 oz mature gouda cheese, cubed
4 oz of crispy crumbled bacon. Save the fat!
4 medium sized pork chops
salt and pepper to season
1/4 cup beef stock
small splash of dry white wine
3 oz double cream


Cook and mash the cauliflower and set aside. In one skillett, add a TB of butter and a TB of coconut oil and  fry the seasoned pork chops until cooked. Remove the chops to a plate and deglaze the pan with the splash of white wine and then the beef stock. Reduce a little, add the cream and let cook a little until a bit thickened. Put the pork chops back in the pan with the juices on the plate and put in the sauce so they stay warm. In a skillett, fry the bacon in 1 TB of coconut oil until crispy. Remove the bacon from the pan and now fry the chopped savoy cabbage until cooked and nicely browned in places. Add the onion to the mix and cook on medium a further couple of minutes until glazed. Add the garlic and sautee for another minute or so. Now it's time to put it all together: in the cauliflower mash (heat up if too cold) add the savoy cabbage/onion/garlic mixture stir well. Now add the bacon and the cheese cubes. To serve: add a pork chop with some sauce to a plate, and make a little sauce 'valley' in the mash too... This is very hearty and warming. The cabbage mixture freezes well, if you leave out the cheese.


And finally for this round of keto recipes: Dutch beef stew in the crock pot

 Dutch slow cooked beef stew or 'sudderlapjes'
serves 6
ingredients:
2 TB expeller pressed coconut oil
2 pounds of braising beef, in large pieces (I had 3 pieces)
seasoning (I used salt, pepper, paprika)
1 TB of tomato paste
1 large onion cut into 6 or 8 pieces
2 carrots, chopped in large pieces (they come out before eating, too carby)
a piece of celery root, chopped in pieces (I had about 8 1 inch pieces)
1/4 leek, chopped in pieces
3 cloves of garlic, chopped into 4 pieces each
2 medium tomatoes quartered
3 bay leaves
sprig of rosemary
3 sprigs of thyme
parsley, freshly chopped
1 cup of creme fraiche
1 TB of cold butter
guar gum for thickening if necessary


In a 6 quart crock pot, add all the vegetables.
Season the beef on both sides.
In a heavy bottomed pan/pot melt the coconut oil and brown the seasoned beef on both sides. Now transfer the meat to the crock pot, and lay on top of the vegetables. Deglaze the pan with the water and add in the tomato paste. Pour this into the crock pot and add the wine and the beef broth. Add the thyme and rosemary and cook on low for 6 hours. After about three hours, stir things around a bit if you like. After six hours, check if the meat is falling apart. This means it's cooked. Now remove the carrott pieces and the bay leaves. Add the creme fraiche and set to high until the stew starts bubbling again. Now add the cold butter and if you need more thickening the guar gum. Finally add the creme fraiche and chopped parsley and serve. This is delicious as a thick soup, or over shirataki noodles or rice as well as cauliflower mash. Really good. This freezes well too, so great for making in advance.


Lots of keto foods: recipes and pictures! PART 1

I've been paying attention to my macros lately and adapting lots of Low Carb and High Carb favourites to suit my keto macro needs.

I also bought a CrockPot and have been using it for slow cooking and of course for making bone broth! I'm going to be daring and even make some fish stock soon! I ordered some fish bones and heads, etc from the fresh fish counter at my local supermarket and picking them up this weekend, so I'll get back to you on that one!

First off, my favourite breakfast: Keto Porridge, Dutch style...

Keto Porridge, Dutch style
serves 2
ingredients:
1TB ground flax seeds
2TB ground almonds
2TB ground hazelnuts
2TB chia seeds
4TB dried coconut, I use finely chopped, it looks a little like sawdust!
2 scoops protein powder (I use Source Naturals vanilla whey protein powder)
1TB gelatin powder (I use Great Lakes Beef Gelatin)
1/2 tsp ground cinnamon
1/2 tsp ground vanilla bean
sweetener to taste (I use stevia powder)
pinch of celtic or himalayan salt
1/2 cup double cream (I use organic cream)
1 1/2 cups cold water
2 TB butter (I use Kerrygold)


In a small pan mix all the dry ingredients. Add the cream and the water, whisk until everything is mixed and let stand for 5 or so minutes. The mixture will thicken. Now slowly heat the mixture until it starts bubbling. Keep stirring and turn the heat to low for another minute or two. As you are heating the mixture it will get less solid, but don't worry, if you serve it will thicken up properly again. If you find the mixture too thick, just add a little more water.

To serve, divide the mixture into two bowls, add more sweetener if you feel you need it and top the porridge with a TB of butter. EAT!
I prepare the dry mixture beforehand and divide it per portion in a plastic bag. Then, when I want to eat my breakfast I have everything ready and I can cook it in 7 minutes. Perfect.


Next up: Oopsies, my style; I used Cleochatra's recipe (My Lighter Life) as my starting point and added a few bits so they held up better and had a bit more flavour. These are savoury keto replacement bread buns.

Oopsies, my style
makes approx 14-16 buns
ingredients:
6 large eggs at room temperature, separated
1/4 tsp cream of tartar (Weinsteinbackpulver)
200gm package plain cream cheese (I use Buko, der Sahnige)
2 TB bleached almond flour
2 TB flaxmeal
4 TB ground parmesan cheese
pinch of salt
ground black pepper
paprika powder, unsmoked

Preheat oven to upper lower heat setting and to 160 degrees celsius.

Separate the eggs and add the cream of tartar to the egg whites. Also add a pinch of salt. In another bowl mix the yolks with the cream cheese, the almond flour, the flax meal, the parmesan cheese, a little salt, pepper and paprika. I use a handheld mixer and make sure everything is well blended.
Then whip the egg whites until very stiff and slowly fold into the yolk mixture. Once mixed (it's ok if not perfectly mixed) get two baking sheets and line them with parchment paper. On each sheet drop about 6-8 mounds of the mixture, making them a little flatter and a bit round. I don't really worry about the shape. Then put the sheets above one another in the oven and cook for 15 minutes. Then switch the sheets round so all the buns get cooked evenly and let cook for another 15 minutes. Then turn off oven and leave with the door open for about 5 minutes. Take the buns, they will be pretty flat by now, out of the oven and leave them to cool on a rack.

To store, use a container and layer the buns between paper and keep the lid loosly on top. These keep up to a week or so in the fridge and they can be frozen too. When you thaw them, make sure some air can get to them, otherwise they become wet and sticky. The buns can be toasted as well.


Next recipe: creamy spinach and ground beef. It's really a beef florentine style dish, made simple for a quick meal.


Creamy spinach and ground beef

serves 2
ingredients:
2 TB expeller pressed coconut oil
250 grams of ground beef
salt
pepper
paprika powder
dried majoram
dried basil
1 1/2 cups frozen chopped spinach, defrosted and drained
4 oz cream cheese


In a heavy bottomed pan melt the coconut oil and fry the beef. Halfway through the beef being cooked, add the herbs and the spices. Make sure the beef is broken up properly. Once cooked, add the spinach and heat through. Finally add the cream cheese. Serve on top of shirataki rice or noodles and top with some freshly ground parmesan cheese. This meal takes about 15 minutes to cook, so perfect when you have little time and still want a nutritious dinner.

Part 2 coming up after the break... xxx C.


Sunday, 11 January 2015

It's been a while: back to blogging!

I've been MIA for a while, sorry!

After a nice holiday in September 2014 by the seaside in Domburg, I had to work very hard and had a lot to do before going off to Bogota in Colombia for a work conference.
Of course when I came back I was in a rush to finish any and all work before I had my bunionoplasty on my left foot. And here we are in 2015!

I will be posting lots once I get my pictures in order but you can expect the following posts from me in a short timespan:

- enjoying the beach
- making bone broth and soup
- Bogota
- bunionoplasty and good nourishment for operation recovery
- hair care
- feeding our garden inhabitants
- fitness
- keto meals
- body care
- turmeric, my go-to miracle product/food/medicine

xxx, C

Monday, 1 September 2014

Weekend musings: raised garden beds and soup making

Well, the weekend was busy. We have built a raised garden bed and I made lots of chicken bone broth.

A picture of the finished raised bed:


I already sowed some radish seeds, and will sow some carrot seeds as well for a late harvest before winter. After that, we have to be patient and start properly next spring!

The weather was autumnal, and so in between the burst of sunshine we had thunderstorms and lots of wind and rain. Perfect weather for nice warm soup!

I always save chicken carcasses and I freeze them until I have enough for two large pots of broth.

Here's a simple and delicious recipe for chicken bone broth that I think is failsafe:

Ingredients:

Chicken carcass and bones, enough to fill 2/3 of a large soup pot.
good splash of organic apple cider vinegar, unfiltered
1 onion, outer dirt removed, quartered
1 large clove of garlic, cut in half
celery root, leaves and stalk, roughly chopped
whatever leftover raw vegetable cuttings you have: i use ends of carrots, some cauliflower
parsley, about a handful
a medium sized tomato, quartered
about 6 juniper berries, dried
about 6 pimento berries, dried
about 20 black peppercorns
2 cloves, dried
sea salt to taste

In the large soup pot add the carcasses and bones and cover with filtered cold water. Make sure the bones are under about an inch of water. Add the apple cider vinegar and cover, and leave for an hour. Don't turn on the heat yet.
After an hour or so, turn the heat under the pot on and bring to a boil. Turn down the heat until the liquid is just simmering. With a slotted spoon take off any scum and foam that floats on the surface. After about 4 hours of simmering, add all the other ingredients save for the salt. Leave to simmer for another 8 or so hours, or longer. I tend to switch mine off before I go to sleep and switch on again the next morning. I've found that simmering for up to 24 hours but with a minimum of 8 hours gives nice results. Once you deem the broth ready (just taste it), sieve out all the debris (bones, vegetables, spices) and add the salt to taste. Once the salt is incorporated, you can divide the broth in portions, leave to cool and store. The broth keeps for about 5 days in the fridge, and months in the freezer.

I use this as a base for many soups.


I'm making a courgette or broccoli dinner-soup on Tuesday, so I'll post a recipe and some pictures of the result. 

xxx C.


Friday, 15 August 2014

Natural skincare: my routine and favourite products

Another week has gone by without posting, time flies when you're busy!

We've been building a raised garden bed so we can enjoy lots of home grown veggies next year. Once it's finished I'll dedicate a post to the whole building, filling and planting of raised beds.

Here's a picture of the frame so far:


Now for my facial skincare routine...

Since changing to all natural cosmetics, I've been trying out lots of products. I still change between products, depending on what my skincare needs are at the time.

First of all, I have dry, sensitive skin with a lightly oily t-zone and very rarely do I get spots.
For cleansing I generally cleanse in the evening and use the oil cleansing method: with an oil of your choice gently 'wash' your face and then using a soft towel that is wet with warm water give yourself a 'steam' bath. You lay the towel over your face, wait a little while and softly rub your face once and rinse and repeat untill the dirt is on the towel and not your face. Then a final rinse with cold water and you're squeaky clean and your skin is cared for. It's a really deep clean without harsh rubbing or using harsh soaps. Works a like a dream on my skin.

When I have an eczema outbreak on my skin, I use coconut oil for oil cleansing and moisturising.


When I have clear skin, I use my own blended oil cleanser: 1/4 castor oil, 1/4 apricot kernel oil and 1/2 olive oil. This is when my skin behaves normally. For travelling I got a trial sized bottle of jojoba oil from Primavera, and as this bottle closes better than the plastic one with my own blend, it's saver putting into my beauty bag. Sometimes, when the mood strikes I use Martina Gebhart Shea Butter cleanser, it's a lovely lotion cleanser, and I rub this all over my face and remove with a soft towel and afterwards I rinse my face with water. 

After hard work and lots of sweating and grime (working in the garden does this), I sometimes use Dr Bronner's Magic Soap in Neutral-Mild (unfragranced) diluted 10 times in water as a face wash. I do moisturise extra after, as even diluted this much it tends to dry out my skin a little.

I bought lots of the turquoise face towels: I can use a new one every day and only have to wash them once every two weeks. I wash them at 60 degrees with a Sodasan detergent that is unfragranced. 


After cleansing, whether it's morning or night, I like using a toner of some kind on my face. Depending on my mood and skin appearance, I change between rose water, orange flower water and witch hazel water. I bought empty pump diffuser bottles, so I have I just finished my bottle of YUULI Metamorphic Elixir, which is really expensive but so, so nice. I'm definitely getting this again. In fact, I just got paid, so I'm placing an order with Amazingy right after posting here! The facial mist is amazing: it is moisturising, so perfect for an oil free night care regime and for people with oily skin for during the day. I find it really calms the skin, gives a wonderful glow and really improves the general appearance of the skin over time.


After toning, I then layer my care products. Every morning and night, I use Dr Alkaitis Organic Soothing Gel, which is lovely and gentle, and clears up any eczema flare ups I have. (Especially when I moisturise with coconut oil after, it's a magical combination for my skin.) This is all the skin care I do in the evening, I don't use any oily products over night, which seems to have improved the general feel and look of my skin.
In the morning, I do what takes my fancy: I either use Dr. Alkaitis Organic Nourishing Treatment Oil, Pai Rosehip Oil (DO NOT USE IN THE SUN) and depending on the sunshine add a suncare product over the oil once it's gone into the skin. Especially with the Pai Rosehip oil I tend to use the SPF 30 if I know I'm going to be outside for longer than walking from my car to the office. Otherwise I use SPF 15. 

For lip care, I love the Weleda Everon lip care stick. I love the smell, the consistency and the care it gives! I don't need lip care every day. Normally once we get to the colder months I tend to use it.


So that's my skincare routine. I'm not super consistent, but tend to cleanse my face in the evening and only splash with water in the morning. One consistent thing is always the Dr Alkaitis Organic Soothing Gel, I love this a lot. And once I have the YUULI Metamorphic Elixir again, I guess I'll use that regularly too. Everything else really depends on my mood and the condition of my skin.


In the spring BioBox delivery I got this Arnica Gel Cool Lavender from Go&Home. I was initially a little annoyed and couldn't imagine using it at all, but that all changed in the last month: We got mosquitoes! And this gel is wonderful at keeping mosquitoes at bay and for reducing swelling and itchyness from mosquito bites! It now lives on my nightstand, so I have it at hand before I go to sleep. I rub a little onto my arms and legs and since then I've not had a bite. And mosquitoes love me.... 


Next post I'll report about some hair care findings, and I'll post a homemade courgette soup recipe...

xxx, C.

Wednesday, 6 August 2014

Recipe: Spicy chorizo and zucchini tomato sauce

We've been harvesting zucchinis and tomatoes like crazy lately. All that nice warm weather with plenty of sunshine and a bit of rain does the vegetables good!

Combine the harvest with the souvenirs we brought back from Barcelona and you have a great dinner!

Yesterday I made a nice pasta/rice/whatever sauce with what we had in the fridge and the garden, and we both really enjoyed it. So here's the recipe:


Spicy Chorizo and Zucchini Tomato keto sauce

Ingredients:
serves 4 fairly hungry people

1 tablespoon coconut oil, butter or any kind of frying fat you prefer
1 medium sized onion, chopped fine
4 medium sized, very ripe tomatoes, or 2 large very ripe tomatoes, cut into small cubes
2 medium sized zucchinis, cut into cubes
2/3 spicy chorizo sausage, cut into small cubes (take skin off first!)
1 clove of garlic, pressed
1 tablespoon tomato paste
1/2 cup plain cream cheese
3 tablespoons creme fraiche
1 sprig rosemary
3 sprigs thyme
1 bay leaf
1 handful flat leaf parsley, chopped fine
1 handful celery leaves, chopped fine
1/2 handful chopped lovage leaves
1/2 handful basil ripped fine (chopping reduces the flavour, so rip them; they will have more flavour)
salt and pepper to taste


Instructions:
In a large pot or pan heat the fat of your choice and add the onions. Reduce to medium heat and fry until glazed. Then add the chorizo cubes and fry on high for a few minutes. Keep stirring, burnt chorizo is not nice! Add the rosemary, thyme and bay leaf. Once the chorizo is evenly fried on all sides, get the zucchini and add to the pot. Stir well and fry on high for a few minutes. Add the tomato paste, stir and cook for a minute or so. Add the chopped tomatoes. Reduce heat and leave to simmer for about 20 minutes. At this time cook the rice, pasta or whatever you want to eat your chorizo dish with. Add the pressed garlic to your chorizo veggie pot and the cream cheese and stir well until properly mixed. Simmer for another 3 minutes. Remove the hard stalks of the rosemary and thyme and fish out the bay leaf. Add salt and pepper to taste. (You will hardly need anything, it's quite strong tasting already!) When you are ready to serve, add the creme fraiche and fresh herbs and stir in quickly. Now you are ready for spicy deliciousness!

Serve over pasta, rice, fried potatoes, or like I did with shirataki noodles and enjoy! For extra indulgence you could add a little grated manchego cheese or parmesan....


I love the bright vibrant colours of the dish, it tastes the way it looks: happy and fun!

xxx C.

Tuesday, 5 August 2014

Sunscreens: what works in natural cosmetics?

So sorry for the late, late post! I've been playing catch up at work and at home we started a new project: building a raised bed for our veggies next year. Very exciting, but it's more work than we initially anticipated.
I'll definitely dedicate a post to the whole build and all the work around it once we are ready!

Anyway, today is all about sun care. I tried a few sunscreens in the natural cosmetics sector and found a brand that I so far like a lot. And when you find something that you like and it works, well you stick with it!

So without further delay I present to you Eco Cosmetics!  


The Eco Cosmetics sunscreens are really good and in the picture above you can see which products I currently have in use. The ingredients are limited, no thousand incomprehensible components, no parabens, petrochemicals, phthalates, silicons, synthetic sunscreens, or nanoparticles. The main sunscreen they use in their products are titanium dioxide and for some products karanja oil. For the rest nice and caring oils and plant extracts and waxes. They don't cover you in a white sheen like some mineral sun screens and they are pretty economical in their use, so although the aren't the cheapest products around, they last quite a while.

I use sunscreen on my face every day, especially since I've had some moles removed and a pre-cancerous spot on my nose treated. So I usually use the green Eco Cosmetics face cream that contains SPF 15. This is a tinted lotion, goes on lightly and does not take too long to sink into the skin. The colour is suitable for everyone, as it really blends in well and does not add or take away much from the natural skin tone. It is a light enough product to wear under make up or on its own. A little goes a long way and so far I've not had any issues at all when using this product on my face.

If I know I'm going to be out in the sun I use the Eco Cosmetics SPF 30 face gel, on the left of the face cream. It's thicker and feels and looks like a yellow/gold oil. It goes on quite easily, but here a little goes a long way too and it takes longer to really settle on the skin without looking like an oil slick. I use less than one pump and that is enough for my whole face and neck. It protects really well and does not have an unpleasant fragrance, reminiscent somewhat of unripe peaches.

At the beginning of summer I used the tinted SPF 30 cream. Especially my legs look whiter than white so this is a bit of help when you want to wear shorts but not scare the little children in your neighbourhood! It is quite thick, but spreads nicely and gives a very light hint of colour. Watch out for stains when wearing lighter clothing as it is mineral based it will rub off! This cream works really well and I like its protection. No sunburn, and at the end of the day still a hint of colour even though I don't sit out in the sun on purpose.

For ease of use I bought the Sun Oil SPF 30, which has similar ingredients as the SPF 30 face gel, just a little more liquid. I really like this one, but if you are going to be bothered by the shine from the oil, I would sooner use the cream... This does not make you look white, purely because it's an oil and does not contain zinc oxide.

And finally on the far left, my SPF 50 lotion, which I use for days that I know I can't avoid being in the sun. I have to say it goes on quite easily and does not leave behind a too noticeable white film when you spread it well. Works a treat and so far I've found here that it is the nicest consistency and has served me very well on those extra sunny days when gardening work has to be done or when I was in Barcelona and could not avoid the midday sun.

Last but not least the lip balm SPF 30: It is useful and works well but I don't love the consistency. It's quite waxy and thick. But I only use it if I know I'm going to be in the sun. Otherwise I use my trusted Weleda Everon balm.


For after sun if I really need it I have a huge aloe vera plant at home. I just cut off a leaf, scrape out the gel and apply. Works a treat for almost any skin problem! Alternatively I really like the Soothing Gel Serum from Dr Alkaitis, it is a miracle in a bottle! I often use it straight after cleansing my face in the morning or in the evening. It is for the whole body, so not just used as a face care balm.

I have some Melvita Prosun to try out: still haven't gotten round to it, as I've not had or made the time! I bought some bodypeeling from Melvita too, and thought as a preparation for the selftanner I could scrub with the body scrub and then moisturise with the fragrance free Body Oil from Balm Balm and then the next day apply the Prosun... So far, no go!

For a nice glow I've been using the Melvita L'Or Bio, which I love! It gives a really nice natural shimmer and really smells like summer! Very nice and coconutty! Definitely worth investing in, as it lasts forever because a little goes a really long way. Also suitable for face and hair. It's a dry oil, so you don't look like an oil slick after applying. Not suitable to use as a sun screen of course, as it does not have SPF!


Here a quick picture of the Sagrada Familia in Barcelona... Already a lot further in the build than last time when we visited Barcelona three years ago.


We really had a lovely time and of course came home with lots of delicious foods from the local market... The other day we had a dinner consisting of tapas, really nice and a little bit of Spain in our own back garden!


Next time I'll write up a little about my delicious chorizo garden vegetable pasta/rice/anything sauce and I plan to discuss my face care routine as well!

xxx C.

Thursday, 10 July 2014

Natura dental care: a healthier way to clean teeth

My teeth are actually really good, I'm in my late thirties and I don't have any cavities or existing fillings. However my gums are troublesome, and I don't want to end up with gum disease so I'm taking steps to prevent this and stop/heal the current problems that I have.

I also tend to grind my teeth at night, especially when I am under stress during the day. Since last year I wear a teeth guard for that, but it seems the first one is now at its last legs: I've ground a hole in it on one side already!

I have been using natural toothpastes for quite some time now. I think I started using a brand called Parodontax years ago. I was having problems with my gums, and needed a good toothpaste. My dentist at the time recommended it. At first its salty taste horrified me, and I could just about keep myself from being sick. I persisted however, and grew to love this toothpaste. It is mainly salt and herbal extracts and minerals but one thing that I don't like in there is glycerin. Glycerin prevents your teeth from remineralising naturally.
So about a year ago I ditched my Parodontax and went on the search for a glycerin free, fluoride free natural toothpaste.
I made a few myself, but have found buying one to be a bit more convenient and they certainly taste better than homemade tooth powder!

So here's for my dental routine:

I tend to floss when I think about doing it, which is about twice a week. I know, I should do it every day! I also own a Waterpik and tend to do that a couple of times a week with a salt water solution. I dissolve natural seasalt in water and use that in the container instead of just regular water. It is said to be better that way. As I don't do this often enough, I can't really tell you whether it is better!

I brush my teeth with activated charcoal powder once a week, to get stains off and for a deep cleanse. It sounds horrible, looks quite awful, but it works wonders!

I also like oil pulling, and use coconut oil for this. I used to do this every day, but I now only do it in the morning and evening when I notice I'm coming down with something. It tends to stop colds in its tracks for me.

I use a sonic toothbrush, but I've read somewhere that they aren't that great for people with sensitive gums (me) so I'm looking in to using the Bass toothbrushes and brushing technique. I've ordered the Heal thy Mouth set from OraWellness to see if this is as great as everybody keeps telling me. More on that once I've got this and have started using it for a bit.
I brush my teeth in the morning and evening and scrape my tongue too, to get rid of lingering bacteria that can cause tartar and cavities.

Right now, I use the Lavera Basis Sensitiv toothpaste, and I love it. Nothing funny in there and no glycerin or fluoride either!


Next week, I'll talk about self tanners and sunscreen...
And I'm going to post a recipe for summery stuffed peppers.

xxx C.

Friday, 27 June 2014

Gardening: a new hobby

Since we moved to the house we live in now and have this great big garden, I've discovered I actually like gardening.
I think that because I only lived in appartments with balconies before, the gardening bug didn't have time to infect me!


Now we only need some good weather and we're good to go!

Our dog loves the garden too, and demands lots of entertainment involving squeaky toy throwing, ball throwing, hunting for dog biscuits and rolling in the grass...


We even got a spot with natural shade during the day and where there's evening sunshine. Great for cosy evenings with a nice cold G&T!


We hung lots of chinese lanterns in the tree next to the terrace and added solar lights around the garden, for summer evenings outside.

My boyfriend built a wooden terrace enclosure where we can put flowerpots in the top part, so it gives a sense of privacy when we are eating outside.


I got 5 birdhouses for my birthday from my boyfriend, which adds colour to the garden.
This year there are no occupants, but I'm hoping that next year we will have 'rented out' at least one of the houses to a bird family.


My boyfriend also used his genious to build me a herb rack next to the kitchen door, so I have fresh herbs at my fingertips...

It's a really great way of growing herbs, and most of them are perennial, some just annual, so I can make sure that aside from the regular favourites I can try out new kinds of herbs each season.


On the other side of the rack we have got our mediterranean herbs in pots and they seem to have flourished since planting them over a year ago.
We found the sage underneath our hedge, planted randomly, so we dug it out and put it in a pot and now it seems much happier.


Last year we started also with some fruits and vegetables and had strawberries (they were all eaten by birds, I think I got to eat two in total), red peppers and tomatoes.

This year we are growing a few more veggies, and we've decided to add a raised vegetable bed to our garden next year, so we can try our hand at even more!


The tomatoes here aren't ripe yet, but it's going to be a fantastic harvest!


We've already been able to enjoy a few cherry tomatoes though!


The red bell peppers are taking a while to get started, but we've got tons of potential fruits now.

Cucumbers on the left need a bit more time, but the radishes in the middle are going to be eaten this weekend. The courgettes (zucchinis) are in need of a new container, they are getting huge already, hopefully we'll have a good harvest here too.

We also bought two lemon trees, but I'm not sure how they will do in our climate. So far we've got plenty of starting fruits, and lots of new blossoms, so here's to hope!


Since we haven't grown our own salad this year, I tend to buy organic lettuce of some kind and add lots of our home grown herbs. My favourite salad dressing is one inspired by Nourishing Traditions by Sally Fallon.


Recipe for the ultimate salad dressing

Ingredients to dress a large salad for 4 persons:
3 tablespoons of extra virgin olive oil
3 tablespoons of organic creme fraiche
1 tablespoon of fresh lemon juice
2 tablespoons of freshly grated parmigiano reggiano
sea salt and freshly ground black pepper to taste

Mix all the ingredients together and pour over your salad, mix well and enjoy! The dressing keeps for up to three days in the refrigerator.
I find this dressing goes really well with most salads, but my favourite is lambs lettuce or romaine.

Next post will be on natural dental care, which I hope to post at some point next week.

xxx C
Thursday, 26 June 2014

Natural haircuts: my first-time experience at a natural hairdresser

I am abundantly posting today, probably because I didn't post last week!

This weekend we visited my boyfriend's brother and sister in law in Cologne and whilst we were there I managed to get an appointment at Just Nature for a haircut. Just nature is not only a hairdresser's but also a natural cosmetics store.

I really needed a haircut, my hair was getting quite long (which is what I want) but also looked like it had been nibbled on by rodents! All thin and shapeless at the ends, it really didn't look good anymore.

I gave the hairdresser (very lovely guy, he's a master hairdresser, so he has many years of experience) a simple brief: please cut my hair into a style that's not too out there (I hate 'modern' haircuts) and something where I can just wash and go.

First he really took his time to find out what I wanted, and then I had my hair and scalp brushed. He massaged some Hauschka neem oil into my scalp and then my hair was washed whilst I was lying on a bed. Very comfortable. He used John Masters mint shampoo, which made my scalp tingle nicely. The hairdresser really observed how my hair falls and then started cutting my hair. A lot came off! I now have my hair jaw length and layered, and I really can wash and go! I haven't had a bad hair day since I left there last Friday!

I also left the shop with a few things: John Masters shampoo, a new boar bristle brush, some neem hair water from Hauschka, a trial size peppermint Dr. Bronner's liquid soap, a face mask and new courage with my great new haircut!

If you happen to be in Cologne and you want to visit the shop, its on the Ehrenstrasse number 40. You do need to make hairdressing appointments in advance, but browsing the shop is already more than worth it. They have a great selection of natural cosmetics.

XX, C.


Deodorants: can we stay smell-free and non-toxic?

I think one of the first things in natural cosmetics after trying no-poo (more on that when I get to hair care) was trying to find a 'clean' deodorant that also stopped me from being smelly all day long.

The search was quite long, and I'm not sure if I've found my holy grail in natural deodorants yet.
I first made a homemade stick deodorant and a roll on, then experimented with a cream type. I found that aside from it being awfully messy (especially the stick deodorant) to make, I wasn't getting the consistency nor the function of store bought conventional deodorants.

I think I also had a mindset that I had to stay dry, like when you use a chemical laden antiperspirant. Once I got away from those thoughts, I decided to try some store bought natural deodorants, mainly in roll on form, some in pump spray.

I tried many store bought ones that DEFINITELY did nothing, worse: they made me smelly!
Even though I like some of the Hauschka products, their deodorants are definitely not part of the products that I enjoy. Neither are the Weleda deodorants, nor the Alva ones. They just didn't work.
I was slowly giving up hope that I was ever going to not be smelly if I wanted to be chemical free under my arms.


At some point I happened to be in a Douglas shop doing some work research and stumbled across a natural deodorant from Biotherm. It is called Deo Pure Natural Protect and has the EcoCert label. This is one I still like using, even though it's expensive. I find it works especially good when doing sports and when you know it's going to be a very hot day. If you don't like alcohol, then this roll on is not for you. I find it works well and is gentle enough to even use after shaving. The fragrance is a nice fresh and sparkling witch hazel and citrus fragrance. There is also a men's variant of the same deodorant, and I've used that one as well. The fragrance is a bit stronger litsea cubeba, but function and price are the same. I just happened to get the mens one when I found the women's variant was not available. This is one of the items of natural cosmetics that are great to get at airports in bulk, as you can really save on the cost!

The second Deodorant I found was from Ovimed, a stick deodorant. Unfortunately, aside from all the nice essential oils there are still petrochemicals in this one, so it was a one off buy. It did work, and if you don't mind propylene glycol et al, then this could be a very nice aluminium, talc, silicone, and paraben free alternative. It certainly worked very well, although the smell is quite special. I would say the smell is a herbal spicy citric fragrance. Not really my thing, but the fragrance doesn't overpower at all.

At the moment my favourite everyday deodorant is the cream deodorant from Soapwalla. I love the consistency, the smell and how well it works, even on warmer days. The consistency is light gritty, but not too bad, considering it is a baking soda based deodorant cream. So far I haven't noticed stains on my clothes either. The fragrance is quite polarising I think, but also totally natural, and I really like it. There are notes of tea tree and peppermint and I find that the peppermint lasts longer.


Last but not least: the deodorant creams from Ponyhuetchen. This is a Swiss brand/shop, and I like them a lot. I recently ordered Bluetenzauber (a pretty floral fragrance) and Kokoskuss (a sweet coconutty fragrance) and got a sample of Erlkoenig (a green herbal fragrance) to try out. The consistency of the creams is light gritty, but not overly so. They go on really nicely, and so far have not stained my clothes. They work well, and last all day long without losing their functionality. The fragrances of these three aren't natural, so be aware when you order deodorant creams to check should this be important to you. I don't mind too much, I think the dosage of fragrance is very low anyway, so it shouldn't cause issues to non-allergic people.
Since the allergens aren't labelled on the ingredient list, I would think that they are below the registration level or allergen free.

I still have a Speick roll on deodorant to try out. I got it in my first ever Biobox in April. Once that has been tested, I'll post an update.

Next post will be about gardening: veggies and herbs and I'll post a recipe for my ultimate salad dressing.

XX, C


Tuesday, 17 June 2014

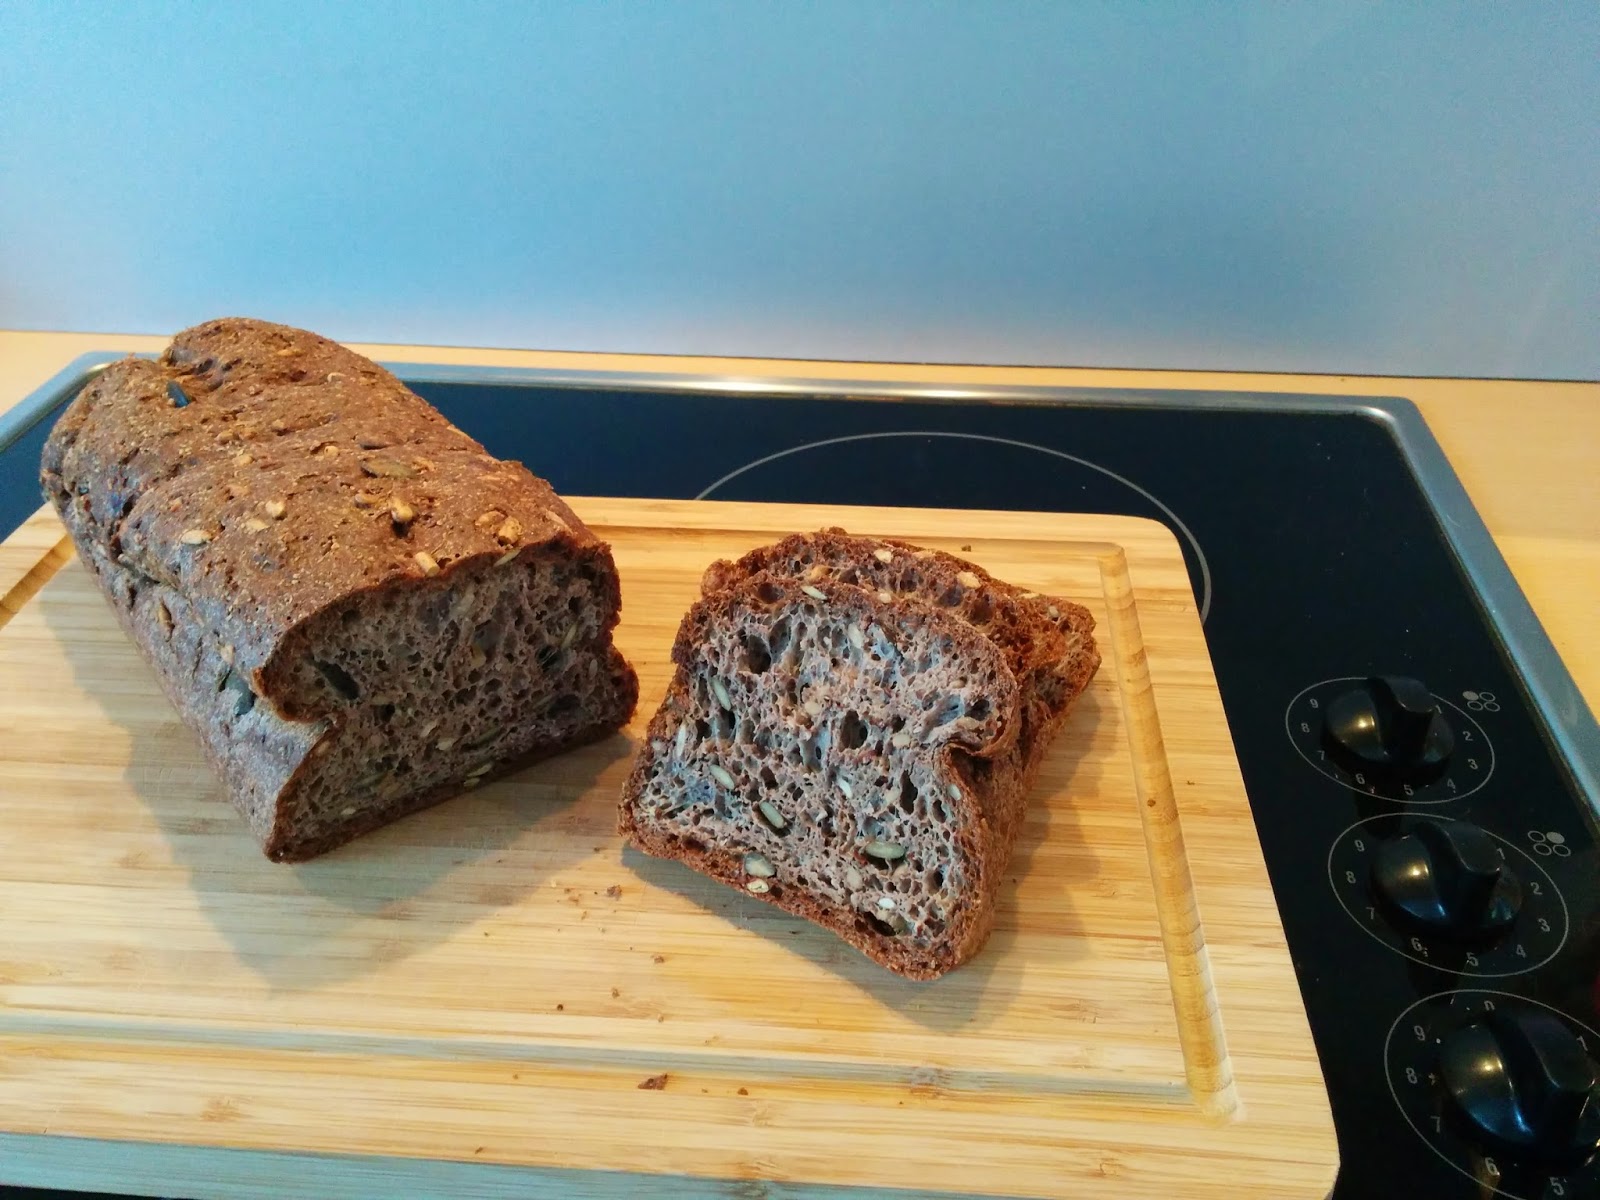
Recipe: Grain Free Bread


I'm back from my conference in Deauville. 

It was really great, I spent three days networking, talking, catching up with old friends and ex-colleagues, smelling old and new things and getting inspired.

Once back home we had guests over on Saturday and on Sunday to BBQ. This of course involved getting several delicious flat breads and dips from our fabulous Arabic/ Mediterrannean supermarket at the end of the street. Since several grains cause allergic skin reactions for me, I need to eat grain free bread. Not such a simple thing. I try to eat a fairly ketogenic/ low carb diet, so many of the gluten free breads you can buy in store are out too.

Maria Emmerich has a great recipe for bread, and I used that for inspiration to create my own. It's reminiscent in taste to Waldkorn brood, a Dutch very dark wholegrain bread.

I've been making this bread for about six months now and I usually make two loaves at a time and slice them up and freeze the slices so I always have some bread on hand if I fancy it.

Here's the recipe:

'wholewheat' seed bread for allergics, inspired by Maria Emmerich

Makes 2 medium sized loaves.
One serving is 2 slices.


Ingredients:

2 medium sized bread loaf pans, I use silicone
1 cup blanched almond flour
1 cup ground almonds
1 cup flax meal
90 grams psylium husk powder
1/4 cup cracked flaxseeds brown
1/4 cup sunflower seeds
1/4 cup pumpkin seeds
1 teaspoon baking soda, aluminium free
2 teaspoons cream of tartar
1 teaspoon celtic sea salt, fine
5 tablespoons organic apple cider vinegar, unfiltered
7 egg whites
2 tablespoons lightly roasted macadamia nut oil or another oil of your choice
1 3/4 cup boiling water


I use measuring cups and spoons because it's so easy and since I've had to adapt a lot of US recipes it just seemed to be the logical option. You can find them in most good kitchen stores and of course online.


Preheat oven (upper/lower heat setting) to 350 degrees Fahrenheit/ 175 degrees Celsius.

Mix all dry ingredients apart from the seeds well. Add the seeds, mix well again. Then with a kitchen machine with the dough appliance (I used a handheld mixer with dough hooks) add the egg whites, the vinegar and the oil and knead well until mixed. You should have crumbs. Then boil the water and pour it in the bowl immediately and knead until sticky and well mixed. To do this I also use a regular handheld mixer with the dough hooks. It saves time and isn't so messy. Divide the dough into two, and fill the two medium sized bread tins with the dough. Press down so there aren't any large gaps, this prevents too many holes in the bread when cooked later on. The tins are up to 1/3 to 1/2 full. Bake in the oven for 1 hour and 40 minutes. Take the bread from the tins and set on the rack with the oven off and the door open for 10 to 20 minutes to dry out completely. Then move bread to a cooling rack and cut when cooled off into medium slices. Freeze those that you are not going to eat, and keep the rest in the fridge.


Enjoy! I love toasting my bread and spreading it with mushed avocado with a little garlic and seasalt. But the world's your oyster really!

Tomorrow, I'll post a short review of my latest used deodorants.

xxx C.

Friday, 6 June 2014

Chaos: a normal state of being


So we have a nice dressing room at home. His side: organised, everything nicely folded and in its place. My side: clothes, bags and shoes crammed in double the space he has, and I'm needing more space! Reason why: I can't get rid of anything! I don't hoard, but I certainly am loathe to sort through my things and maybe pack them up and bring them to a charity shop, and throw away shoes with no more mileage. I always think I could use the items at some point. I never do! So on the programme for when I get back from my business trip: a clear out of my wardrobes.

The picture above is my dressing table. My sweetie installed a mirror with LED lights alongside so I can really see everything clearly. It's an old dressing table/desk that belongs to my mother, and I used it as a desk myself when I was younger and still in school. Now it's back in my posession and serving me very well again.

I have been better at organising my cosmetic products: I have separate drawers for separate areas of my body and so it's more overseeable. I use a mixture of high end niche natural cosmetics and cheaper products. I guess I like treating myself to a more luxurious item from time to time. I love trying out new stuff, and so I've got lots to discuss here!

Week after next, I'll start with deodorant reviews and a discussion of which ones I like to use.

xxx, C.

Thursday, 5 June 2014

I'm going to do some writing, cooking and reviewing here!

Very soon my personal blog about natural cosmetics, health and nourishment will be properly written into existence. For now just a quick post.

I can't promise anything new and/ or revolutionary, but I can promise entertainment, reviews, recipes and my testing failures!

I have been inspired by some wonderful blogs on health, food and natural cosmetics and I wanted to share what I have learned and experienced so far in my quest to get healthier and live a more environmentally responsible life in our consumer society, without having to compromise on luxury and pleasure! (I promise, this will have been the longest sentence on the whole blog!)

I'm off to a conference next week, but once I get back I'll try and review a product or two at least once a week, post a recipe or two and maybe entertain with some anecdotes from my life.

xxx, C.

P.S: You can write your comments in either Dutch, German or English
P.S: Ihr könnt eure Kommentare entweder in Niederländisch, Deutsch oder Englisch schreiben
P.S: Jullie kunnen je kommentaren in het Nederlands, Duits, of Engels schrijven